Sunday 22 September 2013

Vanilla Ice Cream Cone Cupcakes


I've been meaning to make these for ever such a long time, and although I know it's not an original idea, we seem to be having a mini heatwave reminiscent of summer and so it's probably the right time to share them. I took advantage of a recent day of leave from work to make the cakes and take them into work in the car. One of my difficulties with this recipe is that it's pretty difficult to transport the finished product for me - they're too tall for my tins and have a propensity to fall over and I had serious concerns about a successful bus journey with them. So my day off seemed like the perfect time to attempt them.

I was a little nervous because I've tried making these before, a couple of years ago. I can't remember which recipe I used but suffice it to say that the attempt was not successful. Overflowing and overdone does not make for a happy baker. And it was impossible to trim off the overflow without damaging the cones so I gave up and didn't attempt them again. Until now, when I saw the recent (well, relatively so) BBC Good Food magazine cover and remembered that I needed to conquer this recipe. I looked at their recipe which calls for 200g each plain flour, butter and caster sugar, 2 eggs, 4tbsp custard powder and vanilla (but no raising agent) and decided not to trust them (my loss probably - I guess with no raising agent that amount of mixture would fit into the cones) partly because the recipe states that it makes 10 yet calls for 12 flat bottomed cones...


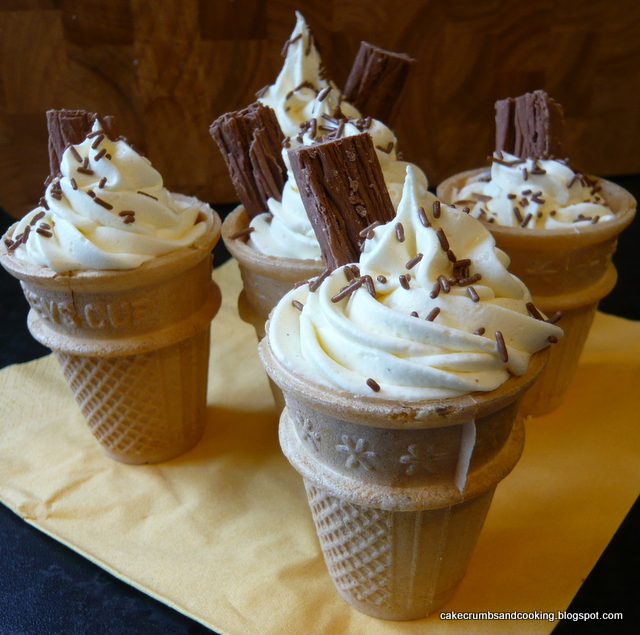
Anyway, I decided to use a standard victoria sponge recipe and go carefully when filling the cones, which worked admirably. And then make a lovely soft, whippy white chocolate buttercream to top them with, along with the obligatory flake and chocolate sprinkles.

Vanilla Ice Cream Cone Cupcakes
Ingredients
125g softened butter
125g golden caster sugar
2 large eggs
125g self raising flour
1-2tsp vanilla extract

For the white chocolate buttercream
105g butter, softened
175g icing sugar
70g white chocolate, melted and cooled slightly (I used Green and Blacks with lovely vanilla seeds in it)
small splash hot water

To decorate
Chocolate sprinkles
Flakes (I used full size Cadbury Flakes, chopped into thirds. You'll need 5 flake bars and I had a piece leftover)

Method
- Preheat the oven to 180C/Gas 4. Stand 14 flat bottomed cones in a 12 hole muffin tin, placing two on the top of the tin (or just stand them on a baking sheet).
- Cream the butter and sugar until light and fluffy.
- Add the eggs, flour and vanilla and continue to mix until well combined. It will be quite thick, this is ok.
- Divide evenly between your cones. I had intended to make 12 but found myself with too much cake mixture. I think 14 was right because 12 would have been too full or overflowed. There was just one cone that I thought was slightly underfilled.
- Bake for 20-25 minutes then allow to cool on a wire rack while you make the buttercream.
- Beat the butter until it is very soft. Add the icing sugar in two stages, beating well until it is smooth and creamy. Add the melted white chocolate and continue to beat until the mixture is light and fluffy. I added a small splash of water to make it easier to pipe and used a Wilton 1M tip to pipe the buttercream. 
- Decorate with sprinkles and flakes and admire your handiwork!


My colleagues were really very impressed with these and there was some discussion as to how the cake managed to get inside the cone... not many people knew that cones bake quite happily without burning and it was a source of wonder!

I'm pleased to have finally managed this recipe successfully - I made these a good few weeks ago before changing jobs and they were a final farewell to my lovely and much missed colleagues (although I am lucky enough to be working with lots of lovely new people now too).

I guess this is the explanation for my blog absence too - moving to a new job with more responsibility on the other side of the country, settling in and getting to grips with the job and people haven't left me much time to blog. Added to which I've sort of only half moved house - I am renting somewhere and simultaneously trying (currently unsuccessfully - anyone fancy a nice three bed semi with potential to develop?!?) to sell my house means that I'm back and forth and parted from most of my baking equipment for much of the time. Time to bring out the violins! I probably won't be around much for a while (certainly not until I get an internet connection in the new place - I'm sorry I haven't been commenting much recently, I'm still reading) but I'm still alive. Thanks to all the people out there still reading ;-)


I'm going to enter these into the Calender Cakes challenge, as I'm just catching the end of National Cupcake week and the challenge this month is cupcakes. Hosted this month by Laura of Laura Loves Cakes and co-hosted by Rachel of Dolly Bakes.

Thursday 18 July 2013

Yeo Valley Blueberry Yogurt Cake


Quite often I do something I think is fairly sensible but then doesn't really work out... what am I talking about I hear you thinking. Well, I buy fresh berries with all good intentions of eating them and then when I realise that I'm not going to manage it I freeze the berries. All well and good, but they then stay in suspended animation in the freezer for a very long time. Too long. 


I need to clear the freezer(s) out in a reasonably short time frame (I'm not going to manage it, but I'm going to try) and since a large amount of fruit is currently resident in the freezer it seems sensible to try and use some of it up. Whilst browsing the internet recently I came across a recipe for Raspberry, Lemon and Yogurt Tealoaf on the Telegraph food and drink website. The recipe is by Sarah Mayor and has been published in the recent cookery book from Yeo Valley - well known for making yogurts. 

As it happens I currently have a fridge full of yogurt too (another of those healthy things I buy but don't always get round to eating!) and so this seemed like the perfect recipe to use up some ingredients. I didn't want a loaf though, as I wanted the cake to cook more quickly and I also didn't bother with the lemon, and substituted blueberries for raspberries. 


You can find the original recipe here. I defrosted the blueberries in the fridge overnight, and they were only just defrosted which probably helped because the cake batter was incredibly stiff, really, really thick and I didn't think I'd actually get the blueberries to mix through, but managed eventually. I ended up using Total 0% fat greek yogurt rather than the specified wholemilk yogurt and used 1tsp vanilla instead of the lemon. I used 25g extra flour instead of the almonds for allergy reasons and didn't do the topping, but aside from all these changes (!) followed the recipe!!!


My cake took about 70 minutes to bake in an 8" round tin and although I had been concerned that it might be a little dry as the batter was so stiff I was pleased to find it was soft and moist with lovely blueberry hits throughout the cake. The stiff mixture prevented the berries all sinking to the bottom, giving a good distribution through the cake. Next time I think I'd take the time to add the lemon because I think the cake would definitely benefit from that added flavour lift. I finished with a dusting of icing sugar (the cake hadn't quite cooled by the time I needed to take it to work so I didn't want a fancy topping). A very successful cake and one I'd make again.


This month's No Waste Food Challenge, started by Kate at Turquoise Lemons is being hosted by Elizabeth of Elizabeth's Kitchen and is titled 'Freezer Stash'. This cake made great use of some of my many blueberries and is my submission.

Thursday 4 July 2013

Chocolate Cashew Cookies

Chocolate Cashew Cookies

I was recently contacted and asked if I would like to take part in the Aero Perfect Pairing challenge. With the offer of Niki Segnet's book 'The Flavour Thesaurus - Pairings, recipes and ideas for the creative cook' I was definitely in. The book arrived along with a big bag of Aero's Chocolate Orange bubbles (which I didn't manage to get a picture of) and a bar of Aero mint chocolate. 

I made some chocolate orange cupcakes using Nigella's Storecupboard Chocolate Orange cake recipe (one of my standby recipes) and topped them with some chocolate frosting and the chocolate  orange balls. Unfortunately, making cakes in the morning before work isn't really conducive to having enough time to allow them to cool, so they were still warm when I put the chocolate frosting (which was itself still warm and runny) on them and the chocolate orange bubbles kind of melted. Sorry, no pictures!


I have to confess that I wasn't quite sure which flavour combination to go for - I wanted something I thought would work, but which isn't too widespread and well known. The brief stated that the recipe didn't have to include either Aero or chocolate but being a bit of a chocoholic, I decided that I would include dark chocolate in my recipe. 

A cookie recipe that I'd bookmarked ages and ages ago from the Hungry Hinny sprang to mind as being an interesting one in which to incorporate different flavours. The recipe is for cream cheese cookies and doesn't use egg at all. I increased the amount of flour slightly and hope that the Hungry Hinny doesn't mind me reproducing my attempt at these cookies. Very unusually for me, I made these by hand - only a bowl and spoon required - no need to make washing up and use the stand mixer!

Creamed butter and cream cheese

Chocolate Cashew Cookies
Ingredients
85g cream cheese (I used full fat Philadelphia)
85g butter, melted and cooled slightly
1 tsp vanilla extract
105g light muscovado sugar
150g plain flour
1/2tsp bicarbonate of soda
1/2tsp salt
30g cashews, roughly broken/chopped
50g dark chocolate, in small chunks

Method
- Preheat the oven to 160C. Line two baking trays with parchment paper.
- Beat the cream cheese until softened, then add the melted butter and vanilla. Keep beating - it will turn from curdled looking lumpy mess into a beautifully smooth batter (I had serious doubts when I saw the initial mixture but it all turned out fine). 
- Beat in the sugar and then the flour, bicarbonate and salt until a dough forms.
- Fold in the cashews and dark chocolate. 
- At this point I ignored the instructions to leave for 30 minutes to chill and just dolloped small blobs onto the lined baking tray, spread well apart. (For my mixture putting it in the fridge didn't really seem to make much difference - I put the rest of it in the fridge while the first batch of cookies were baking, but actually preferred that first batch slightly - the second batch appeared 'grainy' - no idea why)
- Bake for 15 minutes until very light brown. Allow to sit for around 10 minutes once removed from the oven to make it possible to transfer them to a wire rack (they'll be very soft once they come out of the oven).
I made 22 cookies from the mixture.

Soft cookie dough

Verdict? Actually, personally I wasn't all that keen on this cashew chocolate combo - I couldn't really taste the cashews and think I should have toasted them before adding them which would have enhanced their flavour and made them crunchier - cashews are quite a soft nut really. Otherwise successful and colleagues liked them more than me. The actual cookie dough part was very soft and far more cakey than I was expecting. I'd like to try the recipe again though. I'm wondering about using some golden syrup sugar from Tate and Lyle I bought recently and using dried fruit like cranberries along with the chocolate. An interesting recipe to play with.

And my colleagues finished up all of the Aero chocolate orange balls quite happily!

Cakey cookies

Disclaimer: I received a copy of 'The Flavour Thesaurus' and some Aero products. All views expressed are my own. Thank you Sophie.

Monday 10 June 2013

Easy No-Churn Banoffee Ice-Cream


Well, it appears that warmer weather has finally found the UK over the past couple of weeks (although I am nervous to say it for fear of driving it away again!). So to celebrate the warmth I thought I'd make ice-cream. I thought it would be nice to make something quite quick and easy and a little cheat-y too but that doesn't mean that this won't be delicious.

Inspired by Kavey's Bloggers Scream for Ice-cream challenge many months ago (July 2012) I have been intending to make no-churn ice-cream for a long time. Using sweetened condensed milk and whipped cream as the base for the ice-cream means that you don't need to churn it to get a smooth, crystal free ice-cream, perfect for people without an ice-cream machine.


Easy No-Churn Banoffee Ice-Cream
Ingredients
300ml whipping cream
200g (half a tin) condensed milk, chilled to speed the freezing process
150g Bonne Maman Confiture de Caramel (or use Nestle's Carnation Caramel)
2 small to medium ripe bananas (or large, depending on taste)
You'll also need a freezer-proof container or two depending on size

Method
- Whip the cream until it reaches the soft peak stage, don't overwhip.
- Whisk in the condensed milk until you have a combined mixture with soft peaks.
- Chop the bananas into the mixture.
- In order to get a caramel swirl you have two options
      - if your freezer-proof container is big enough you can pour the banana mixture into the container, then add the caramel and swirl carefully.
        - if you're going to be tight on space, swirl the caramel into the mixture in your mixing bowl but then don't mix too much more as you pour it into the container to freeze.
- Freeze for at least three hours or until solid. (I left mine overnight)

Serve with extra caramel (for more luxury) and extra banana (for more health!). If the ice-cream has hardened too much, allow it to soften a little in the fridge or at room temperature to make it scoopable.


I was recently contacted by Fruitdrop - a company who deliver boxes of fruit to workplaces and asked if I wanted to develop a recipe for them. I used bananas to make my ice-cream. They delivered one of their fruit boxes to my house (although the driver looked most confused - he said he'd never delivered to a residential property before!) and were very accommodating about having to work around me leaving the house at a rather early hour.

A Fruitdrop fruit box - with rubbish lighting - sorry!

I wasn't asked to review the contents of the box, but actually, I want to. As well as being very helpful to work with the quality of the fruit in the box was very high indeed - all of the fruit was fresh and unblemished - it had obviously been packed and transported with care (including nectarines!) and I think the quality was probably better than equivalent supermarket fruit. The box contents were as follows: 16 bananas, six pink lady apples, ten satsumas, two nectarines, three peaches, four gala apples, six packham pears and a huge bunch of grapes. The nectarines, peaches and pears were under-ripe, but this is understandable given that they cannot be transported ripe and given a couple of days would have been fine. You can find out more about Fruitdrop boxes for offices here - there is pricing information and I think my box was a 'Seasonal' one. 

Selection of fruit from the box

As I'm not such a fruit bat that I could have eaten all of the fruit before it went off I took the box to work to share with colleagues and quite a number of them commented about the high quality of the fruit. They were also very pleased to have a refreshing change from cakes!!! Sadly the organisation I work for does not have the capacity to take this idea on, but if it did I'm sure it'd be well received.

Thank you to Fruitdrop and Alice for the box.

This is a sponsored post, however I was not required to write a positive review; all views expressed are my own (or my colleagues'!).


Sunday 2 June 2013

Rhubarb Cupcakes


I keep seeing rhubarb in the shops at the moment and decided to buy some to bake with. The only way I've ever really had rhubarb in the past is in crumble and not for years and years. For some reason I can't recall, I had convinced myself that I didn't really like it very much. It seems that's not really true! 

The rhubarb I bought is the outdoor variety (the forced kind having gone out of season months ago) so the colour is more towards green rather than the pretty bright pink kind you see in the winter/spring months, but the flavour is still good.

Reduced rhubarb syrup - pretty in pink

I decided to make rhubarb cupcakes from one of my less-used baking books, The Primrose Bakery Book, which is the second from the Primrose Bakery (yes, I do have the first one too, and have actually made quite a lot out of it!). I can't find a legitimate copy of the recipe on the internet, but it involves chopping and stewing the rhubarb first to cook it and then draining the cooking syrup. This is then reduced to make a thick sticky syrup to add to the buttercream. The stewed rhubarb is added to the cupcake mixture. The only change I made to the recipe was to omit the 1tsp ground ginger called for and replace it with 1tsp vanilla extract. I found that after the specified 25 minutes the cakes were pretty much cooked but because I'd been a numpty and set my oven too low they weren't coloured at all (note to self: check oven temp) so I turned the oven up and left them a bit longer to colour. This meant that I was a little concerned they'd be dry and so used some of the reduced rhubarb syrup as a glaze.

Glazed cupcakes before buttercream

The buttercream recipe wasn't my most successful attempt. The recipe in the book calls for 110g butter and 500g icing sugar, along with the reduced rhubarb juice from stewing the rhubarb. I thought this sounded unbearably sweet and started out with 110g butter and about 200g icing sugar. Unfortunately the buttercream split slightly when I added the rhubarb juice and a little warm water to slacken the mixture, I'm not quite sure why. 

Buttercream in the making

I ended up trying to rescue it by adding more sugar (to about 300g total), whisking like mad and I also added about 30g melted white chocolate (as the chocolate is supposed to stabilise the fat/sugar emulsion). It worked out in the end and the buttercream didn't split again but it was too sweet for my tastes. I think I'll add more white chocolate and less sugar next time. Because the rhubarb syrup is added to the buttercream you get a natural, very pale pink colour. 


These were ok, not the best thing I've ever made - the cakes were on the moist/heavy side and as above the buttercream wasn't my favourite. I also found I couldn't really taste the rhubarb but I did discover that I like the smell of rhubarb cooking, which is a good thing!


Since these are an 'R' bake I'm going to enter them into Alphabakes, hosted this month by Ros of The More than Occasional Baker and cohosted by Caroline of Caroline Makes. I haven't managed many challenges over the past few months, but I'm off to an early start here!

LinkWithin

Related Posts Plugin for WordPress, Blogger...